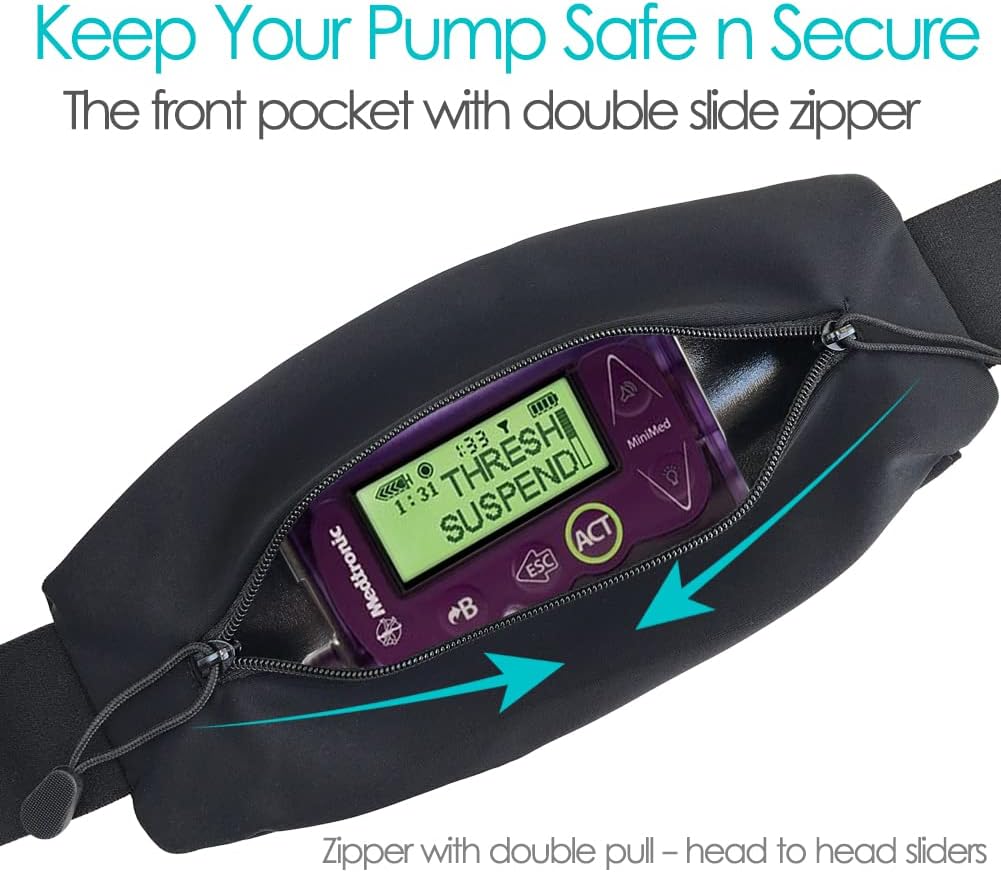
If you’ve recently started using an insulin pump — a small, pager-sized device that delivers a steady drip of insulin throughout the day instead of multiple daily injections — you’ve probably already hit the wearability question: where do I actually put this thing? An insulin pump connects to your body via a thin plastic tube (called an infusion set) or, in tubeless systems like Omnipod, adheres directly to your skin. Either way, the pump goes with you everywhere: workouts, work meetings, sleep, showers. Getting the carry system wrong means a pump that snags on doorframes, pulls on your tubing, or slides around until it’s just distracting enough to ruin your day. The good news is that a solid aftermarket has developed around this problem. Belts, clips, armbands, thigh pouches, waistband cases — the options are real and well-reviewed. This guide maps the landscape, names the tradeoffs, and ends with a clear decision framework so you can match the right accessory to your lifestyle without buying three wrong ones first.
| EDITOR'S PICKInsulin Pump Belt with Mesh Pou… | Mid-tierInsulin Pump Belt with Double S… | Budget pick4H Tough TPU Screen Protector f… | |
|---|---|---|---|
| Type | Waist belt + pouch | Waist belt + pouch | Screen protector |
| Fits | Insulin pump, Epipen | Insulin pump, Epipen | Medtronic 770G–620G |
| Closure | — | Double zipper | — |
| Tubing slits | ✓ | — | ✗ |
| Adjustable | — | ✓ | — |
| Pack count | — | — | 2 |
| Price | $17.98 | $14.99 | $5.99 |
| See on Amazon → | See on Amazon → | See on Amazon → |
Why Pump Placement Is a Clinical and Comfort Decision at the Same Time
Most people start with the belt clip that ships in the box. It works — until it doesn’t. The clip can disengage during exercise, the pump sits awkwardly under clothing, or it just becomes a source of low-level stress when you’re moving fast. Per Mayo Clinic’s patient education resource on insulin pump therapy, one of the most common reasons people discontinue pump use in the first year is discomfort and inconvenience rather than clinical dissatisfaction. That’s a fixable problem.
There’s also a clinical dimension that practitioners shouldn’t overlook. The FDA’s consumer information page on insulin pumps flags that tubing kinks, tension on infusion sites, and accidental disconnection are among the leading causes of unexpected pump-related glucose excursions. A carry system that keeps the pump stable and the tubing organized isn’t just a quality-of-life upgrade — it reduces the mechanical stress that leads to delivery errors.
Key variables to match before buying an accessory:
- Pump type: Tubed pumps (Medtronic MiniMed, Tandem t:slim X2) need tubing management built into the carry solution. Tubeless systems (Omnipod DASH, Omnipod 5) don’t carry an external device the same way — focus shifts to pod protection and skin adhesion.
- Body site preference: Abdomen, flank, thigh, arm, small of back — each site favors a different carrier form factor.
- Activity level: Sedentary desk work vs. gym training vs. manual labor each create different retention requirements.
- Clothing style: Waistband access, pocket depth, and whether the user wears fitted vs. loose clothing all affect which carrier is visible or hidden.
The Main Accessory Categories: What’s Actually Available
Clip Cases and Hard-Shell Holsters
The default belt clip that ships with most tubed pumps is functional but minimal. Third-party hard-shell holsters add a meaningful upgrade: rotating belt clips that swivel 360 degrees (so the pump can face different directions as you move), reinforced locking mechanisms, and in some cases a clear window so you can read the screen without removing the pump.
Owners of Tandem t:slim X2 systems consistently report that the stock clip loosens over time, and many shift to aftermarket holsters within the first three months. Brands like Nite Ize and Medport (which manufacturers a dedicated diabetes carry line) are frequently cited across aggregated reviews on diabetes community forums and patient advocacy spaces monitored by organizations like the American Diabetes Association.
Tradeoff to name explicitly: Hard-shell cases protect against impact but add bulk. If you’re wearing slim-fit clothing, a holster may print visibly or create enough bulk to be uncomfortable. Soft cases sacrifice some protection but sit flatter.
FSA/HSA eligibility: Pump cases and holsters sold as medical device accessories typically qualify as FSA/HSA-eligible expenses. Confirm with your plan administrator — documentation from your endocrinologist that the accessory is medically necessary strengthens borderline claims.
Waistband Belts and Pump Bands
These are the most versatile category for active users. A pump belt is a stretch fabric band worn around the waist, under clothing, with a built-in pouch sized to the pump. The pump rides at your natural waist or just above the hip, completely hidden. Tubing exits through a small opening in the pouch.
Buyers who exercise regularly — runners, cyclists, gym users — consistently rate waistband belts as the most secure option during movement, per aggregated reviews on diabetes-specific retail sites and in Healthline’s overview of living with an insulin pump. The pump doesn’t bounce, the tubing is protected, and there’s nothing clipped to outerwear that can snag.
The sizing math matters here. Most pump belts are sized by waist circumference, not pump model. A belt sized for a Medtronic 780G will fit the Tandem t:slim X2 only if both measurements fall in the same band. Measure first. Brands like Pump Wear Inc. and Tallygear (both long-standing in the diabetes accessories market) offer model-specific pouch sizing alongside waist sizing, which reduces the guesswork.
Tradeoff: Waistband belts can trap heat against the skin in warm weather and may shift upward during seated work. Users with larger midsections sometimes report the band rolls rather than stays flat.
Thigh Pouches and Leg Bands
For users who primarily wear dresses, skirts, or any clothing without accessible waistbands, a thigh pouch is the practical solution the category rarely talks about loudly enough. The pump rides on the inner or outer thigh in a stretch fabric or neoprene holster secured by an elastic band. Tubing routes upward to the infusion site under clothing.
Users in the Type 1 diabetes community — particularly women navigating formal workwear and formal event clothing — report thigh pouches as a near-invisible solution for occasions where a waistband bulge isn’t acceptable. The Garter Belt Pump Holder by Pump Wear Inc. and similar products from Sugar Medical (a brand with strong name recognition in the diabetes accessories space) are referenced repeatedly in patient advocacy discussions tracked by the American Diabetes Association.
Tradeoff: Thigh bands can slide downward during vigorous activity. Look for silicone grip strips sewn into the band edge — that single feature, noted across most long-run user reviews, is the difference between a band that stays and one that doesn’t.
Arm Bands
Less common but worth knowing: armband carriers position the pump on the upper arm, similar to a phone armband used for running. These work best with compact pump models and tubeless pods (where arm placement of the pod itself is already normalized). For tubed pump users, arm placement creates a longer tubing run and more potential for snag points — worth weighing against the convenience of easy visual access.
Adhesion Accessories for Tubeless Users (Omnipod)
Omnipod users don’t carry a separate device, but pod adhesion is its own category of concern. The pod’s built-in adhesive is strong for most users under normal conditions, but heat, sweat, and skin type all degrade performance. The FDA’s consumer page on insulin pumps notes that infusion site failures are a documented risk category for all pump types.
Overpatch solutions — thin, breathable adhesive patches applied over the pod to reinforce its seal — are one of the most searched product categories in the diabetes accessories market. Skin Tac (a liquid adhesive barrier), Tegaderm-style film dressings, and brand-specific overpatches from Omnipod’s own line and from third-party brands like Pump Peelz (which also offers decorative skins) all serve this function.
The math on overpatches:
| Product type | Approximate cost per unit | Est. monthly cost (1 pod change every 3 days) |
|---|---|---|
| Tegaderm film (cut-to-size roll) | $0.30–$0.60/patch | $3–$6/month |
| Pre-cut pod-specific overpatches | $0.75–$1.25/patch | $7.50–$12.50/month |
| Skin Tac wipes (per pod change) | $0.20–$0.40/wipe | $2–$4/month |
For a patient changing pods every three days (Omnipod’s standard wear interval), pre-cut overpatches run roughly $8–$12/month — a manageable recurring cost that’s often overlooked in the total cost of pump ownership.
Insurance and FSA Coverage: Where the Lines Are Blurry
Here’s where practitioners managing patient recommendations need to be careful. The pump itself and its infusion sets are durable medical equipment (DME) covered under Medicare Part B and most commercial insurance formularies, per the American Diabetes Association’s 2025 Standards of Care. Accessories are not DME — they’re considered supplies or convenience items in most insurance frameworks, which means they typically don’t clear the same coverage hurdle.
That said, FSA and HSA accounts (pre-tax dollars set aside for medical expenses) cover a broader list of items than insurance does. Pump cases, belts specifically designed for insulin pump wear, and overpatches sold in a medical context are generally FSA/HSA eligible. The IRS Publication 502 (Medical and Dental Expenses) is the governing document, but the practical test is: if the product exists only to support use of a covered medical device, it usually qualifies. Have patients save receipts and product descriptions.
Caution: Decorative skins (like Pump Peelz design wraps) are aesthetic, not functional, and are unlikely to pass an FSA audit. Functional overpatches are a different story.
The Decision Framework: If X, Then Y
This is the part worth bookmarking for patient consults.
If the patient is active and wears athletic or casual clothing most days → Start with a waistband pump belt. It’s the most universally praised solution for movement stability. Recommend a brand that offers model-specific pouch sizing. Flag thigh bands as a secondary option for days requiring different clothing.
If the patient wears professional or formal clothing regularly → Lead with a thigh pouch. It’s the only carry solution that works invisibly under fitted skirts, dress pants, and formal wear. Confirm the band has silicone grip strips.
If the patient is on Omnipod (tubeless) and reporting pod detachments → Overpatch first. Skin Tac wipe before application is a low-cost first step; pre-cut overpatches are the upgrade. If adhesion failure persists after both, the issue is likely skin preparation (oil, lotion residue) rather than the product — that’s a coaching conversation, not a product swap.
If the patient is a child or teenager with a tubed pump → Hard-shell holsters in a waistband configuration are most popular with parents and pediatric patients, per the Healthline overview of pump living. Look for breakaway tubing clips to reduce site trauma from accidental pulls.
If cost is the primary constraint → A basic stretch waistband with a pump pocket (available from several brands under $20) covers most use cases. The incremental value of premium materials shows up over 12+ months of daily wear — for a patient just starting out, the $18 option is a reasonable entry point.
Getting the carry system right won’t show up on an A1C report, but it shapes whether a patient stays on pump therapy or quietly stops using it because it’s too much of a hassle. The accessories market has matured enough that there’s a good solution for almost every body type, wardrobe, and activity level — the main job is matching the right category to the right patient rather than defaulting to whatever came in the box.